About the Hazard Perception Test
Introduction
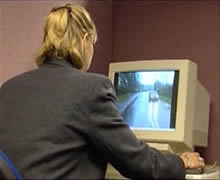
This part of the theory test requires you to view 14 hazard video clips on the computer screen of approximately one minute each. You are required to watch these clips as if you were the driver. There will be 15 hazards to find - at least one on each clip. However, one clip will have 2 hazards. The hazard clips will not contain any sound - just like the old silent movies.
You click either the left or right mouse button whenever you think you can see a hazard developing. The speed at which you click the mouse button as a hazard develops will determine your score for that particular hazard clip. You can score between 0 and 5 on each hazard. Therefore the maximum you can score is 75 (i.e. 15 hazards x 5). To pass you need a score of 44.
The examination processThe hazard perception part of the theory test will start with a short video tutorial played on the computer screen that will explain how the hazard perception test works and what you are required to do. At the end of this clip you have the option to go onto the test or play the tutorial again.
Each hazard clip will start with a freeze frame of the start of the video sequence and a count down from 10 will commence. At the end of the count down the clip will start to play and you will be required to click the mouse button each time you see a developing hazard.
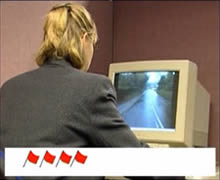
To let you know that the program has registered your click a red flag will appear on a grey band across the bottom of the screen - one flag for each click you make in any particular clip. At the end of the clip all the flags will be removed before you start the next clip.
Although each clip contains several potential hazards only the one that materialises into a real hazard and involves other road users is marked . This is known as a “developing hazard”. Therefore you will only receive a score if you spot a hazard before it fully materialises and is brought about by the action of another road user. You will know if the hazard materialises because the driver will have to take evasive action (e.g. slow down, stop or swerve out of the way).
How to scoreThe score you obtain will be dependant upon how quickly you spot the developing hazard. The time from when the developing hazard could be potentially seen on the screen to when the vehicle arrives at the hazard is the time frame or window used to determine your score.
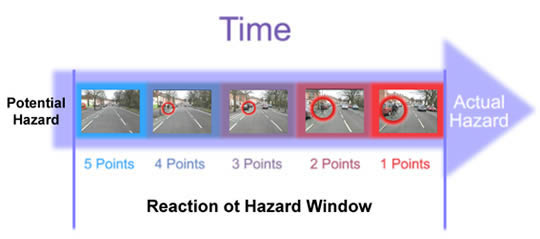
This window of time is divided into 5 equal segments. If you click the mouse while in the first segment (i.e. just as the developing hazard appears) you will obtain the maximum score of 5 points. If you click in the second segment of this window of time you will score 4 points, then 3, then 2 and then in the last segment just 1. This is accurate to one twenty fifth of a second.
If you click several times during this window of time the computer will always take your highest score and record that for that particular clip. If you don’t click the mouse button in this window of time you will score nothing in respect to that hazard.
If you try to cheat the system by clicking the button repeatedly throughout the video clip the computer program will pick this up. It does this by analysing the number of clicks over the clip as a whole and the pattern of clicks. Within the scoring window no such checks are made and if you click several times in this window only the first click will be used to determine your score, as stated earlier (i.e. the highest scoring click).
There is a certain maximum number of permitted clicks for any clip. However, this is far higher than the potential hazards anybody could reasonably perceive. If the computer program determines that you may be cheating a message window will appear at the end of the clip letting you know that an irregular clicking activity was detected and that as a result the score for that clip will be zero.
When the clip ends the screen will turn black for a few seconds before the freeze frame for the next video clip appears and the count down commences again, warning you to get ready. This pattern is repeated until all 14 video clips have been shown.
At the end of the hazard perception part of the theory test you will be given the option to complete a customer care survey if you so wish.
You will then be directed to leave the room and collect your score for the two parts of the exam. The maximum score that can be obtained for the hazard perception part of the theory test is 75 (i.e. 15x5). To pass the hazard perception part of the car, moped and motorcycle theory test you must obtain a score of 44. To pass the theory test you must pass both parts. If you fail either part you are required to take both parts of the test again.
Hints and tipsWhen watching the video clips do not be frightened to click the mouse button whenever you see a potential hazard involving another road user (i.e. anything that you think may cause the driver to change speed, position or direction). Watch the hazard and if it continues to materialise continue to click the mouse button. This will ensure that you click within the scoring window.
Some of these potential hazards will not materialise and therefore you will not receive a score for spotting them. For example, if the cyclist shown in the developing hazard sequence on the previous illustration stopped at the end of the side road (i.e. at the 4 point stage) the hazard would not have materialised. In the actual clip the cyclist was travelling too fast to stop. This was the real clue to what was going to happen next.
In a few instances it is difficult to determine when a potential hazard becomes a developing hazard and therefore when the scoring window should start. This is why it is safer to click a few times as you see a hazard develop to make sure you don’t click too early and miss the opening of this window.
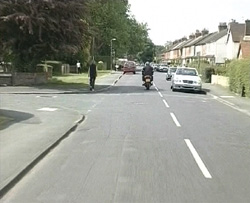
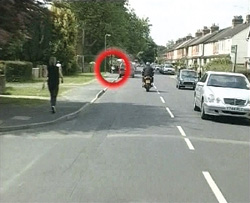
n the example above (supplied by the DSA) you will notice a very young child riding a bike on the pavement. This alone may be classified as a potential hazard, particularly as the child is unsupervised.
However, the scoring window on this clip doesn’t open until the child starts to turn towards the road to cross it as shown below and highlighted by the red circle. This is the point at which the potential hazard becomes a developing hazard and the scoring window opens.
Therefore if you had only clicked your mouse button once as you saw the child riding her bike along the pavement you would have scored zero. Therefore, remember to click the button a couple of times as the hazard develops to avoid this problem.
The types of hazards you need to look for are:- Pedestrians or cyclists crossing the road
- Vehicles emerging from side roads, parking places or driveways
- Large vehicles moving over to your side of the road
- Meeting oncoming vehicles on narrow roads or where other obstructions or slow moving vehicles make the road narrow
- Where animals may wander onto the road
To further help you prepare for this part of the test we have included:
- A section that contains the hazard perception and defensive driving lesson brief taken from the Learner Driving programme of driving tuition
- A section that shows you the scoring windows of each of the eight official hazard perception practice video clips supplied by the Driving Standards Agency (DSA)
Please note the above items are only available in The Theory Test Highway Code Workbook from where the above information was extracted.