Defensive Driving Lesson
Introdroduction
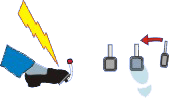 Driving defensively is all about giving you time to react and keeping your options open. Even someone with lightening fast reactions needs time to react. The laws of physics simply prevent a car from stopping dead. Even if you are Superman or Superwoman, with supernatural reactions, you couldn’t stop a car within fewer car lengths than those shown below:
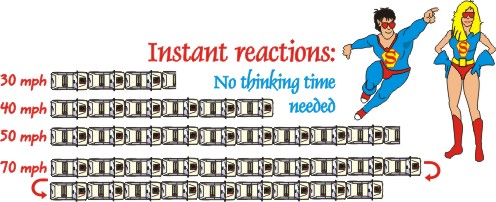
Consequently, anything or anybody who is within the above distances of the front of your car will be hit! You could call this area to the front of your car the impact zone or if you are travelling at 40 MPH or more the killing zone as anyone hit at these speeds is unlikely to survive. This clearly demonstrates the importance of anticipating what might happen and acting upon that rather than waiting until it happens. To do this effectively you need to:
- Look well ahead and perceive potential problems early.
- Apply your hazard drill in good time.
- Give yourself plenty of space.
Looking well ahead to perceive problems early
See and be seen. Take up safe road positions that allow you to see and be seen. Be attentive; focus on the driving task - don’t let your mind wander.
Keep your eyes moving and scan the road well ahead. Avoid staring at any single point ahead or to the side. Concentrate on the available space (i.e. the gaps), not the obstructions.
With experience and guidance from your instructor you will begin to recognise what feedback from your senses is important and what is not. Ignore the superficial information you can see. For example don’t concentrate on identifying individual drivers or pedestrians or the make, model or the colours of vehicles. Instead concentrate on the position, speed and potential course of other vehicles and/or pedestrians both to the front, rear and sides of your vehicle.
Look as far down the road as you can see for any potential hazards whether they are static road features or situations being caused by other road users. A gap in the tree line ahead may mean that there is a side road at that point or an upside down triangle sign in the distance may warn you that you are approaching a T Junction and so on.
Initially you may perceive risks that aren't really there or indeed ignore risks that are. With experience you will begin to develop your own judgement in this regard.
Apply the hazard drill in good time
The hazard drill that we recommend and use is based on a simplified version of the police system of vehicle control. The manoeuvre part of the Mirror-Signal-Manoeuvre routine (MSM) is split into Position-Speed-Gear.
Hazard drill (MSPSG)
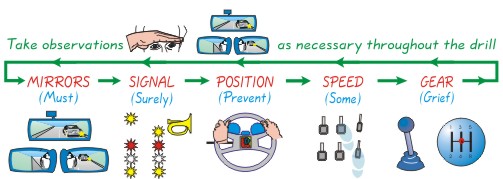
Mirrors:
Use your interior mirror and side mirror(s) early. Glance into your right and left blind spots as appropriate. Because this forms part of your observations this part of the drill may be repeated at any point throughout the drill as required.
Signal:
Give signals in good time. Use signals to help or warn other road users. Be careful not to give misleading signals.
Position:
Determine the best position/course to negotiate the hazard. Think before you change position; be careful not to mislead others.
Speed:
Adjust your speed so that you can negotiate the hazard ahead and stop within the distance you can see to be clear.
Gear:
Select the gear to match your speed and the power you need. Make sure that the gear is selected before the hazard is negotiated.
As soon as you perceive a potential danger begin to employ this hazard drill and determine where you can go or how you can stop if the danger materialises. Remember you need to consider what's behind as well as what is in front when considering your options.
 Give yourself plenty of space – driving in space
You need to give yourself the time to recognise a potential problem and apply the hazard drill. We refer to this as “driving in space”.
Driving in space is all about maintaining a buffer of ‘safety space’ or if you like a bubble all around you at all times. The higher your speed (or greater your stopping distance) the bigger the bubble needs to be.
- Space to the front
Always allow yourself enough room to stop. On narrow country roads with a limited view, this may be as much as twice your overall stopping distance (to leave room for the idiot coming the other way!). - Space to the sides
Make sure that you leave enough room for pedestrians, cyclists, motorcyclists and other vehicles. If you are unsure whether or not you will fit through a gap, you won’t! Give parked cars and pedestrians at the side of the road plenty of clearance. Remember pedestrians are far more vulnerable then vehicles. Allow for car doors opening or children appearing from between parked cars or pedestrians wandering onto the road particularly in crowded streets. Position your car accordingly and reduce speed as the space to your sides is reduced. - Space to the rear
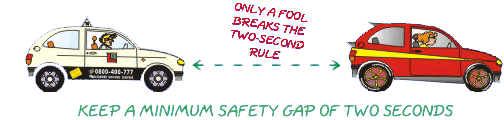
If other vehicles follow too close slow down and let them pass. Remember that it’s your neck that will suffer if someone hits your car from the back! The less space you have at the back the more you need at the front.
Highway code practical references
Rules: 80, 82-84, 103-105, 124-126, 129-133, 144, 146, 163, 168, 169, 180-210, 212, 277 and 278.