Learn to Drive
Driving lesson 6. Hazard drill and junctions
Introduction
You should by now be well on the way to perfecting your foundation skills covered in part 1 of the Learner Driving programme. These foundation skills form the basis of most if not all the road, traffic and reversing skills you will learn from this point onwards. Lesson 6 is the first road skills lesson and covers the basic routine or drill that you will use whenever you negotiate a driving hazard such as a junction.
We call this routine the hazard drill. This drill is based upon a simplified version of the Police System of Vehicle Control. Although this system is normally only taught on advanced driving courses we feel that the basics should be taught to learners and hence the reason for its inclusion in this programme. In this lesson you will be concentrating on using this drill for dealing with simple junctions and other static road hazards found in quiet suburban areas.
![]() Lesson objectives
Lesson objectives
By the end of this lesson you should be able to:
- Use the hazard drill on the approach to simple junctions and other static road hazards such as parked vehicles;
- Safely turn left or right into simple junctions on roads with little or no traffic;
- Safely cross the path of oncoming vehicles on roads with little traffic;
- Safely emerge from simple junctions onto roads with little or no traffic;
- Negotiate more complex junctions with full support or prompting;
- Understand the term ‘hazard’ in relationship to driving;
- Fully understand the need for a routine approach to hazards;
- Understand why the steps in the hazard drill are considered in a specific order but are not always acted upon.
Subject brief
During this lesson you will learn about a special drill to help you deal with hazards safely. The hazard drill that we use is based on a simplified version of the police system of car control. You will learn how to use this drill to approach junctions, and how to use this drill to overtake stationary or slow moving vehicles.
Hazard drill (MSPSG)
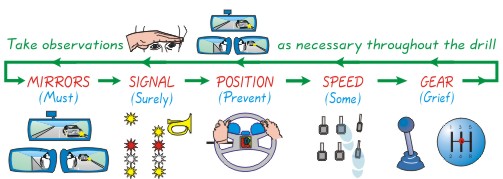
Each time you are presented with a potential or actual hazard on the road (i.e. anything that may require you to have to change speed, position or direction) you will go through the following hazard drill one or more times. While each step of the drill needs to be considered in the order shown it need not necessarily be acted upon.
Mirrors:
Use your interior mirror and side mirror(s) early. Glance into your right and left blind spots as appropriate.
Signal:
Give signals in good time. Use signals to help or warn other road users. Be careful not to give misleading signals.
Position:
Determine the best position/course to negotiate the hazard. Think before you change position; be careful not to mislead others.
Speed:
Adjust your speed so that you can negotiate the hazard ahead and stop within the distance you can see to be clear.
Gear:
Select the gear to match your speed and the power you need. Make sure that the gear is selected before the hazard is negotiated.
Approaching junctions to turn left or right
The hazard drill is effectively used at least twice when you wish to turn left or right from a main road into a side road. Once on the approach and once following the turn. Because of the importance of taking observations before you turn
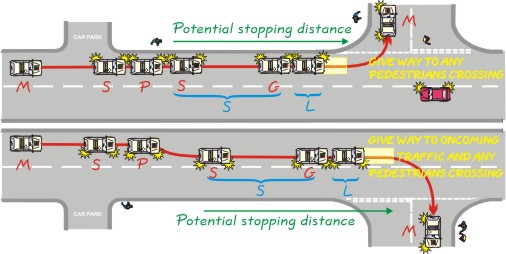
The key learning points are as follows:
- Signal early, but be careful not to mislead others into thinking you are turning earlier than intended. Because it is usually impossible to determine whether other road users will benefit from a signal (particularly road users in the side road) you should always signal when turning at road junctions.
- If the potential stopping distance to the turning point is not sufficient for your current speed you will need to reduce speed before you signal and change position. Consequently, use the hazard drill twice on approach in this situation.
- When turning left you would normally position your car as close to the left as it was safe to do so being careful to maintain adequate clearance from any pedestrians near the edge of the road. Do not overtake any cyclists, motorcyclists or horse riders immediately before your turning. When turning right you would normally position the vehicle just left of the centre of the road (or in the area of the road marked for right turning traffic) provided sufficient room was available for oncoming vehicles to pass safely; otherwise you would keep to the left.
- As you reduce speed in preparation to turn you will need to assess which gear you should select to complete the turn if it is not necessary to give way or stop. Your own skill, the angle of the turn, the width and gradient of the side road and what you can see of the road into which you want to turn will all need to be considered. Basically you continue to reduce speed until you are certain that you can safely negotiate the turn; then at that point select the gear that matches your speed.
- When turning left or right you must give way to any pedestrians crossing the face of the junction. Stop just before the point where you would start to turn if you cannot get the whole of your vehicle into the side road safely. Plan to stop but look to go.
When turning left you have priority over oncoming traffic turning right into the side road. However, when you are turning right oncoming traffic has priority over you so you must wait for a gap in the traffic. Again you would wait just before the point at which you would turn. Naturally, once you have stopped the gap needed to cross the road safely will need to be bigger as you are starting from a standstill position. Therefore you should try to time your approach to coincide with any oncoming gaps that are of a suitable size to allow you to cross.

- If you find that you have to wait; stop just before the point where you would start to turn and select first gear and be ready to move. If you have to wait for a while you should apply your handbrake (if not already applied) and select neutral. Watch for a gap and get ready to move as it approaches; check your mirrors and then turn if it is safe to do so.

- You may require additional mirror checks on your approach if it is particularly long or if the road is very busy. When turning left you need to particularly supplement the use of your interior mirror with the left hand door mirror and when turning right with the right hand door mirror. If you find yourself in a queue of traffic use all three mirrors.
Approaching junctions to emerge
The approach routine when you wish to emerge from a side road onto the major road is the same as when you want to turn into a side road. However, extra consideration needs to be given before you emerge into the major road. In particular, vehicles on the major road have priority over you therefore you may need to slow down or stop to allow them to pass before you emerge.
Observations on approach are critical to determine whether you can emerge without stopping and in which gear. Some junctions are open allowing you to take early observations. Others are closed restricting your view.
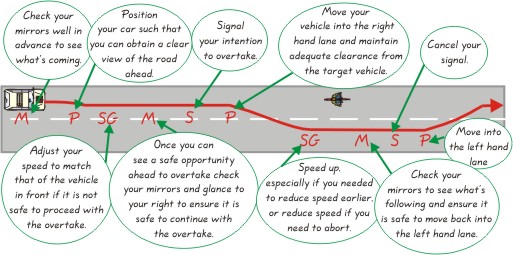
Overtaking slow and stationary vehicles
The overtaking manoeuvre requires you to employ the hazard drill at least three times. Once as part of the preparation to overtake, once as part of the actual overtake and once as you return back to the left side of the road.
Highway code practical references
Rules: 170-172, 179, 180, 182 and 183