Learn to Drive
Driving lesson brief 1. Getting moving
Introduction
Before you can begin to learn to drive you must make sure you have a valid provisional driving license and are physically fit. The main legal requirement in respect to the latter is your eyesight. You must be able to read a car number plate at a distance of 20 metres – about 66 feet or 5 car lengths – with glasses or contact lenses, if normally worn. The main aim of the first lesson is to get you driving. However, before this can happen you will need to know about the main controls of the vehicle, what pre-driving checks are necessary, and finally how to move off and stop.
![]() Lesson objectives
Lesson objectives
By the end of lesson 1 you should be able to:
- Enter and leave the car safely
- Name, and explain the function of the main hand and foot controls
- Complete the necessary pre-driving checks
- Make the appropriate observation checks before moving off and stopping
- Move away safely and under control, making proper use of the accelerator, clutch and handbrake
- Use the indicator switch and understand the basic use of direction indicators when moving off and stopping
- Use the MSM routine when stopping
Subject brief
Your first lesson will cover the function of the controls, pre-start comfort and safety (the cockpit drill), precautions before starting the engine, moving off and stopping.
The main controls
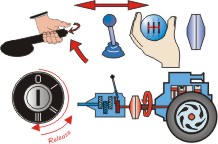
The first controls that you need to learn about are the ‘main’ foot and hand controls.
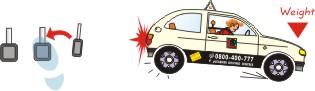
The accelerator pedal
 The accelerator or gas pedal is used with the right foot to control the speed of the car by increasing or decreasing the flow of fuel to the engine. This occurs when the car is in gear and the clutch plates are together. The pedal requires very little pressure to operate and should be used very lightly.
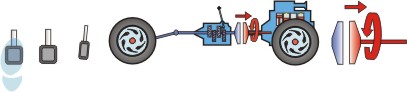
 The foot brake
The foot brake operates brakes on all four wheels and is used to slow the car down. When you press this pedal the brake lights (on the back of the car) come on to warn other drivers that you are slowing down or stopping. This is operated by swivelling the right foot from the accelerator pedal to the foot brake while trying to keep your heel on the floor. The pedal should be pressed progressively harder then as you reach the required speed smoothly released (i.e. squeeze and ease).
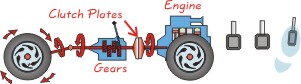
The clutch
The clutch is used with the left foot to break the link between the engine and the wheels by separating the clutch plates. You will use it when changing gear and stopping. To operate the pedal you press it firmly as far as it will go and then release it slowly and smoothly.
The handbrake
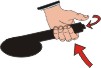 The handbrake is used to hold the car still after it has stopped. Because the handbrake is only connected to two wheels it should not be used when the car is moving. To apply the handbrake you press the button with your thumb and pull the lever upwards as far as it will go and then release the button. To release the handbrake you press the button and push the lever down.
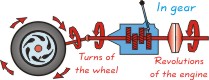 The gear lever
The gear lever is used (with the clutch) to select the gears. The gears determine the number of engine revolutions per turn of the wheel. The higher the number (and therefore the lower the gear) the greater
 the pulling power, but the slower
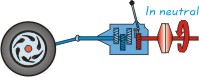
 the speed. There are usually five forward gears and one reverse gear. Between the gears there is a central position called neutral, when the lever is in this position, no gear is selected.
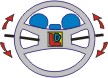
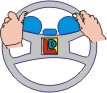
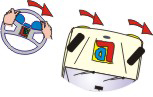 The steering wheel
The steering wheel is used to turn the front wheels when changing direction. You should
 normally hold the wheel with your hands in the 'ten to two position'.Most control is gained when the 'pull and push' method is used to turn the wheel. (Steering is dealt with in more detail in Lesson 3.)
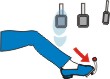
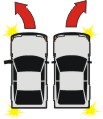 The indicators
The indicator switch is usually located on a 'stalk' to the left or
 right of the steering wheel. The switch is designed for fingertip control. To signal that you wish to turn left or right you simply move the switch in the same direction as the steering wheel turns for the manoeuvre.
The cockpit drill

The cockpit drill is a simple sequence of actions that must be carried out each time that you sit behind the driving wheel.
DOORS: Make sure that all the doors are firmly shut. Take special care if you are carrying children. Use child locks if your car has them.
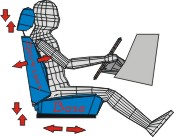 SEAT: Adjust the base of your seat so that you can operate the foot pedals easily.
 Ensure that you can fully depress the clutch pedal while not over stretching your left leg. If the base of the seat can be raised up and down adjust it until you can get a good view of the road ahead.
Adjust the backrest of your seat so that you can reach all of the steering wheel with your arms slightly bent. When adjusting the back of your seat, make sure that the 'head restraint' is adjusted correctly to protect your neck.
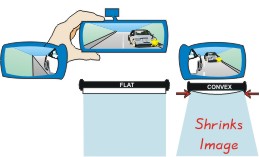 MIRRORS: Adjust all of your mirrors so that you can obtain a clear view of the road behind and to the side of your vehicle. Use your left hand to adjust the interior mirror and be careful not to touch the surface of the mirrors with your fingers. If the vehicle is new to you check which, if any, mirrors are convex (i.e. curved to give a wider field of vision).
![]()
SEATBELTS: Fasten your seatbelt and make sure that your passengers fasten theirs, The driver is responsible for seatbelt wearing by children under 14 years of age. Full details about seatbelt laws can be found in The Highway Code.
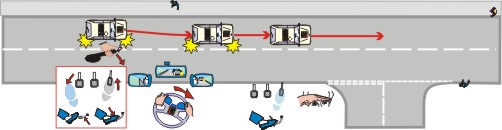
Moving off
Moving off is easy so long as you follow a basic routine. Once you have, started the engine and prepared the car for moving you use the Mirrors - Signal - Manoeuvre routine to move away.
 Starting the engine.
Before starting the engine you should check that the handbrake is on and that the gear lever is in neutral. Turn the ignition key and immediately release it as the engine starts (to avoid damaging the starter motor).
Get the car ready to move (Prepare).
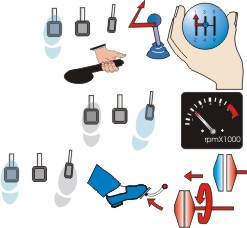
- Press the clutch down as far as it will go.
- Select first gear.
- Rest your left hand on the handbrake.
- ‘Set the gas’ (press the gas pedal slightly and then hold it still). Press it to generate sufficient power to move.
- Bring the clutch up until the sound of the engine drops slightly and then keep both feet still (this is called the clutch ‘biting point’).
 Mirrors, Signal (Observe)
- Check your mirrors. Firstly, the interior mirror, then the left (nearside) door mirror, then the right (offside) door mirror. Is it safe to proceed?
- Look over your right shoulder to check your offside blind-spot. Is it still safe to proceed?
 Signal, if anyone will benefit and return your hand to the handbrake.
Manoeuvre (Move)
- When you are sure that it is safe to move, release the handbrake.
- Bring the clutch up slightly. When the car moves hold the clutch still.
- Press the gas pedal a bit harder, if necessary.
- Bring the clutch up (very gently) all the way and rest your foot by the side of the pedal on the floor.
- Make a check of your mirrors as you start to move.
- Steer to your normal driving position, about a metre from the kerb.
- Switch off the signal, if necessary.
- Press the gas pedal to pick up speed and look well ahead.
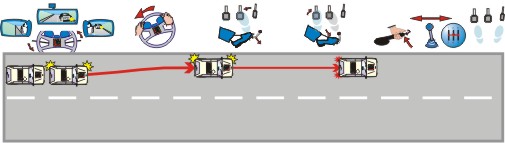
Stopping
Apply the Mirrors - Signal - Manoeuvre routine for stopping. Check your mirrors to ensure it is safe, signal if it will benefit anyone. Steer closer, but parallel to the kerb. Press the foot brake progressively harder and just before the car stops begin to ease off (squeeze and ease) and then depress the clutch pedal fully down as you stop. Finally, make the car safe; apply the handbrake, select neutral, remove your feet from the pedals and cancel the signal, if necessary.
Highway code practical references
Rules: 92, 97, 103, 104, 117, 159-161 and 243